Creating New Assets
- Jordan Wambaugh
Pipeline Workflow Overview
Creating a new asset and putting it into the game requires the following steps:
- Develop of original art asset
- Export assets into tilesheet compatible format (png image, or sequence of png images for animations)
- Compile individual images into tilesheet(s)
- Build tilesheet metadata file
- Build animation metadata file (if doing animation)
- Create an entity that uses the asset
- Put the entity into a map (to test)
- Load the map into a game to test
Pipeline step-by-step
1. Develop original art
How original art is developed is entirely up to the artists. The artist should just keep in mind that the art will have to be converted to PNG to work in the game engine.
2. Export to tilesheet compatible format
- Images must be exported to a format supported by firmament engine. PNG and JPEG are supported, but only PNG has alpha channels, so PNG is the recommended format.
- Images should be organized in directories, one directory for one tilesheet. This makes the next step easy.
3. Compile individual images into tilesheet(s)
This step can still be done but is no longer required. Firmament will now dynamically create tilesheets on the fly if you don't generate them before-hand.
The rest is left here for those wishing to improve loading performance by pre-generating tilesheets.
This can be done manually, but it is recommended that you use a tool like TexturePacker (http://www.codeandweb.com/texturepacker) for this. Firmament comes with an exporter for texture packer.
Setting up TexturePacker
After TexturePacker is installed, you will need to tell it where to find the firmament plugin. These instructions assume you already have firmament engine somewhere.
- Open TexturePacker
- Open TexturePacker preferences
- Find the ‘Exporter Directory’ box
- Click the ‘...’ button and navigate to your firmament folder.
- navigate to the following folder: Firmament/tools/ 3rdPartySupport/texturePacker and hit ‘select’ or ‘choose’ depending on your system.
- Hit ‘ok’ to save your changes.
- in the ‘Output’ pane on the left, you should now see ‘Firmament Engine’ as an option in the ‘Data Format’ dropdown. If you do, then all is well!
Building Tilesheets With TexturePacker
Building tilesheets and their metadata is very easy with TexturePacker.
- Open TexturePacker
- If you are creating a new tilesheet, follow steps 2-
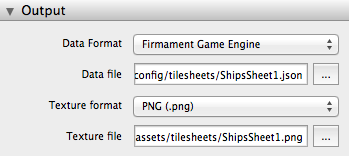
- In the output pane on the left, select ‘Firmament Game Engine’ in the data format dropdown.
-
- In the data file box, navigate to the tilesheets folder for your project (configs/tilesheets) and enter a name for the new tilesheet.
- select PNG as the texture format.
- in the texture file box, navigate to your project’s tilesheet folder (assets/tilesheets) and enter a name for the tilesheet.
- Drag the folder contianing the images into TexturePacker. You should then see the images show up on the right, and in the tilesheet.
- Hit the publish button
. This will generate the tilesheet and metadata files in the specified locations.
- Hit the save button
to save this tilesheet’s configuration (sourceAssets/texturePacker is usally where these are kept in the project)

4. Build Tilesheet Metadata File
If you are using TexturePacker, it does this for you so you have nothing to do for this step.
5. Build Animation Metadata File
If you are not doing animation, skip this.
Firmament uses tiles from tilesheets for its animations. In order for this to work, Firmament needs to know which tiles in a tilesheet make up the animation, what sequence they should appear, and the amount of time between each frame. Tilesheet metadata files do this.
To create a new tilesheet metadata file:
- Find your project’s tilesheet metadata folder (config/tilesheets by default)
- Create a new file called [NameOfTilesheet].json in that folder
Open that file up in a text editor, and put in something like this (this example is from the example project, and is a spinning globe):
{ tilesheetFile:"config/tilesheets/earthAnimation.json" ,frames:[ "globe_1" ,"globe_2" ,"globe_3" ,"globe_4" ,"globe_5" ,"globe_6" ,"globe_7" ,"globe_8" ,"globe_9" ,"globe_10" ,"globe_11" ,"globe_12" ,"globe_13" ,"globe_14" ,"globe_15" ,"globe_16" ,"globe_17" ,"globe_18" ] ,timeBetweenFrames:0.1 }- You’ll want to change the data here of course:
- Set the tilesheetFile to the name of the tilesheet file the animation frames are in.
- the ‘frames’ list should contain the tilesheet labels for each frame. The frames will be animated in the order they are listed here.
- set ‘timeBetweenFrames’ to the number of seconds (or a fraction of a second) to wait between frames.